- Advertising
- Bare Metal
- Bare Metal Cloud
- Benchmarks
- Big Data Benchmarks
- Big Data Experts Interviews
- Big Data Technologies
- Big Data Use Cases
- Big Data Week
- Cloud
- Data Lake as a Service
- Databases
- Dedicated Servers
- Disaster Recovery
- Features
- Fun
- GoTech World
- Hadoop
- Healthcare
- Industry Standards
- Insurance
- Linux
- News
- NoSQL
- Online Retail
- People of Bigstep
- Performance for Big Data Apps
- Press
- Press Corner
- Security
- Tech Trends
- Tutorial
- What is Big Data
Kubernetes Benchmark: Bigstep vs AWS [part 2]
This two-part study compares the performance aspects of running a Kubernetes environment on two different cloud providers: Bigstep Metal Cloud versus Amazon Web Services. While in the first part we discussed network latency, throughput and disk throughput, in this second part we are looking at filesystem read performance, CPU overhead and OLTP performance using Sysbench. Finally, we will also provide a cost comparison between running Kubernetes on Bigstep vs on AWS.

Why Sysbench?
Because it’s the go-to synthetic benchmark tool out there, easy to use and it integrates tests that will cover most use cases: filesystem read/write, CPU, memory and OLTP workloads.
Setup Sysbench and Test Environment
First, we will install sysbench. In centOS and fedora distributions can be installed from EPEL repository:
yum -y install epel-release
yum -y update
yum install sysbench
On Ubuntu and Debian distros we can simple install it with apt-get:
apt-get install sysbench
We have to pay attention to the version of sysbench installed as it may vary from version 0.4 to version 1.0. On Ubuntu to install the latest follow these steps:
curl -O https://packagecloud.io/install/repositories/akopytov/sysbench/script.deb.sh
bash script.deb.sh
apt -y install sysbench
Now let’s get the image running on our clusters. We will use a single instance image with MySQL and a persistent volume attached.
Or simply run:
kubectl create -f https://k8s.io/examples/application/mysql/mysql-pv.yaml
kubectl create -f https://k8s.io/examples/application/mysql/mysql-deployment.yaml
To acces the MySQL server we will start a pod having a mysql client :
kubectl run -it --rm --image=mysql:5.6 --restart=Never mysql-client -- mysql -h mysql –p
Most of the test that we will perform will run inside the container so we need to connect using kubectl:
Get the pods ID by running kubectl get pods and connect using:
kubectl exec -it mysql-<id> -- /bin/bash
FileIO - Filesystem Read Performance
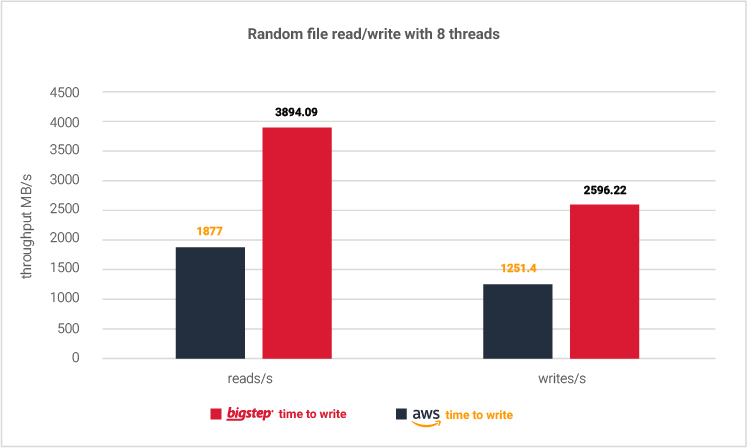
First test will perform some basic write / read operations using prepared files. In order to minimize the cache effect, we could generate files larger than the memory, otherwise the system will use RAM for caching and the test will not be accurate. Note that it is better to limit the resources on containers in terms of memory to avoid generating tens of GB of files.
One other option that is available in Sysbench is to use the flag --file-extra-flags to make use of open(2): O_DIRECT will minimize cache effects of the I/O to and from files. File I/O will be done directly to/from user-space buffers.
sysbench --test=fileio --file-total-size=32G prepare
sysbench --test=fileio --file-total-size=32G --file-test-mode=rndrw --max-time=300 --max-requests=0 run
sysbench --test=fileio --file-total-size=32G cleanup
We get the following results:
sysbench --test=fileio --file-total-size=2G --file-test-mode=seqrd --time=30 --max-requests=0 --file-extra-flags=direct --threads=8 run
reads/s | writes/s | read, MiB/s | written, MiB/s | |
3894.09 | 2596.22 | 60.85 | 40.57 | |
1877 | 1251.4 | 29.33 | 19.55 |

CPU utilization
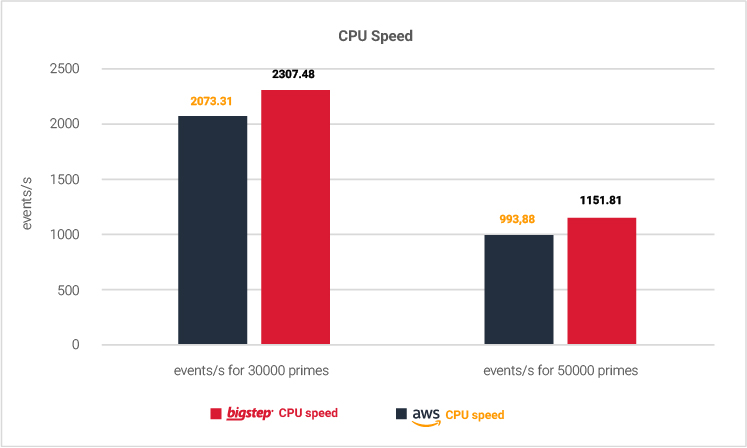
When running the CPU benchmark, Sysbench verifies prime numbers by doing basic divisions: each number is divided by numbers between 2 and the square root of it. This should put pressure on CPU. We ran the following tests, but there was no significant difference:
sysbench --test=cpu --cpu-max-prime=30000 --max-time=30 --threads=16 --max-requests=0 --report-interval=5 run
sysbench --test=threads --thread-locks=1 --max-time=20 run
events/s for 30000 primes | events/s for 50000 primes | thread-locks=1 | |
2307.48 | 1151.81 | 56136 | |
2073.31 | 993.88 | 34028 |
OLTP tests
And finally, our last test in this series will be on database performance in containers: OLTP tests.
Given the nature of how a database is used in kubernetes and in general we set our goal to test the mysql database in 3 scenarios:
- using sysbench from within the container (locally)
- from outside the container (host server) to mysql container, and
- from container (mysql client) to container (myql server)
First tests are within the container. Once we setup sysbench as mentioned above we need to setup the database, grant privileges and prepare the database.
CREATE SCHEMA sbtest;
GRANT ALL PRIVILEGES ON sbtest.* to root@'%';

sysbench --db-driver=mysql --mysql-table-type=myisam --oltp-table-size=1000000 --threads=16 --mysql-host=ip --mysql-port=3306 --mysql-user=root --mysql-password=password --max-time=60 --report-interval=5 /usr/share/sysbench/tests/include/oltp_legacy/oltp.lua prepare
sysbench --db-driver=mysql --mysql-table-type=myisam --oltp-table-size=1000000 --threads=16 --mysql-host=ip --mysql-port=3306 --mysql-user=root --mysql-password=password --max-time=60 --report-interval=5 /usr/share/sysbench/tests/include/oltp_legacy/select.lua run
OLTP | select rand ranges | select rand points | oltp_simple | select | |
1605 | 59397.79 | 73432.57 | 133493.66 | 127609 | |
3110 | 66433.14 | 80194.84 | 133131.3 | 124617 |
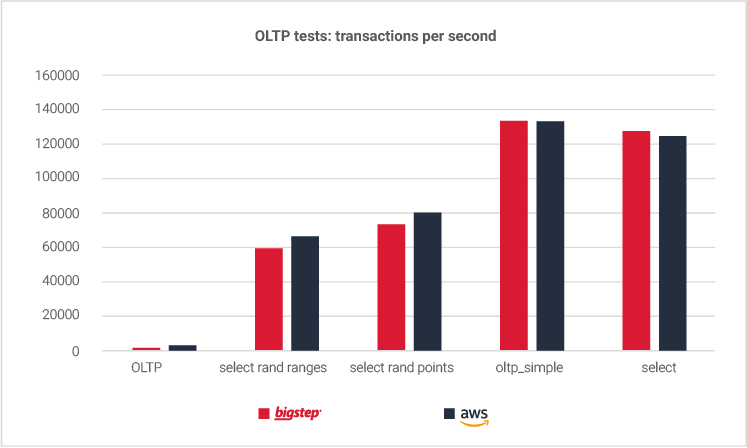
As we can see, most of the tests performing selects (reads) are very similar in throughput, while tests performing writes and reads offers more throughput on AWS container.
The second test is performed using the host server running queries on the Kubernetes container.
Steps are similar, we only need to install sysbench on the host server and point the tool to the internal IP of the mysql server. To get the IP use:
kubectl describe pod <pod_id>
OLTP | select rand ranges | select rand points | oltp_simple | select | |
1319.14 | 31942 | 52685 | 23540 | 23452 | |
3110 | 17428 | 19075 | 21541 | 21645 |
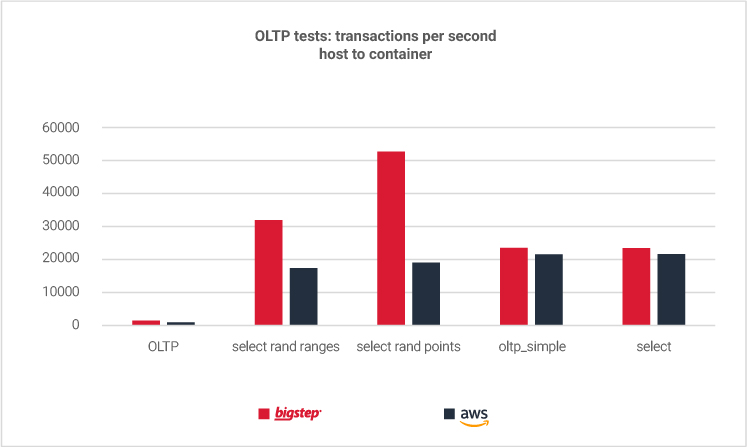
We can clearly see a difference in “select” tests that are putting bare metal container platform ahead while the read/write tests are close. There is a significant increase in the number of transactions per second for random ranges and points: these tests are for MariaDB's key_cache_segments for MyISAM engine. Our assumption for this variation is on the base operating system settings and network performance.
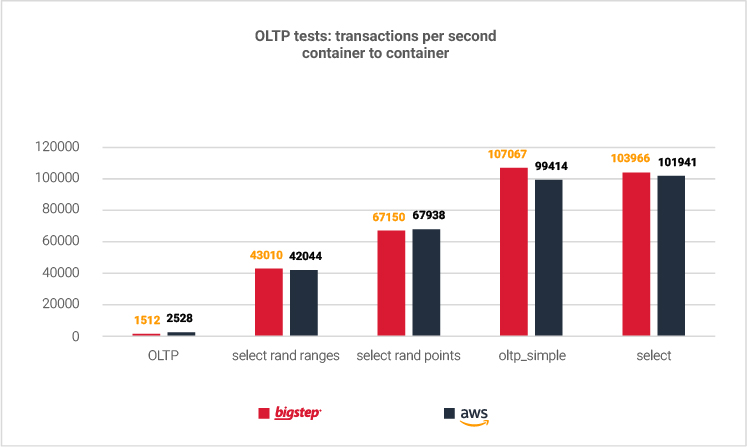
Finally, tests from container to container:
OLTP | select rand ranges | select rand points | oltp_simple | select | |
1512 | 43010 | 67150 | 107067 | 103966 | |
2528 | 42044 | 67938 | 99414 | 101941 |
Cost Comparison
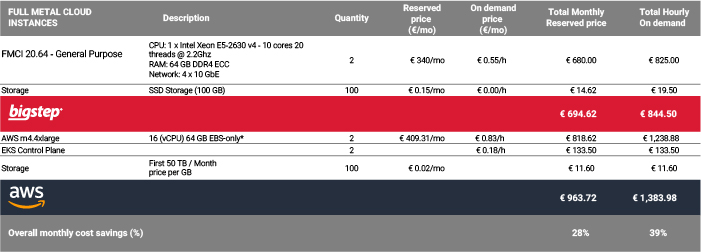
The time spent on running the tests was approximately 8h for each provider. For 8h on demand the cost was approximately € 15.00 on AWS and € 9.00 on Bigstep Container Platform.
The below table gives us an idea of what the cost of running such an environment on a monthly base is, be it reserved or on demand.
Closing Note
In general, there are few differences between the two platforms in terms of performance: CPU overhead is not necessary greater using EC2 instances, filesystem writes is slightly better on bare metal, while reads, both random and sequential, are twice or even higher.
The greatest difference in my opinion is the network layer, where performance is up to five times higher on bare metal container platform having a great impact in latency at running queries from host server and inter containers. We can clearly see the advantages in the OLTP tests as well, especially select statements that imply network traffic.
Of course, there are many aspects not covered in this benchmark, but it should be enough to understand the specifics of bare metal based containers and EKS. It will be interesting to compare the scaling capabilities in both platforms in a future benchmark.
Readers also enjoyed:

IaaS Versus PaaS Versus SaaS: What are the Differences?


Leave a Reply
Your email address will not be published.