- Advertising
- Bare Metal
- Bare Metal Cloud
- Benchmarks
- Big Data Benchmarks
- Big Data Experts Interviews
- Big Data Technologies
- Big Data Use Cases
- Big Data Week
- Cloud
- Data Lake as a Service
- Databases
- Dedicated Servers
- Disaster Recovery
- Features
- Fun
- GoTech World
- Hadoop
- Healthcare
- Industry Standards
- Insurance
- Linux
- News
- NoSQL
- Online Retail
- People of Bigstep
- Performance for Big Data Apps
- Press
- Press Corner
- Security
- Tech Trends
- Tutorial
- What is Big Data
Building the Fastest Wordpress Environment
Wordpress is the most popular content management system in the world and can be installed on various server configurations. While the platform itself is very well optimized, it can suffer from serious performance issues when the traffic is high. In this article, we will use the latest hardware and software technologies to configure the fastest Wordpress stack that can offer an optimal page loading speed even to a very high number of simultaneous users.
To see the updated tutorial for 2021, please click here.

Any kind of virtualization decreases server performance, so we will use a bare metal server (with 8 threads and 32 GB RAM in this example) with SSD storage. In order to benefit from the latest kernel features and software packages, the server will run Ubuntu 18.04. For the actual software stack, we have chosen the fastest options available: Nginx, PHP 7.3, PHP-FPM, Percona 8.0 and Redis.
Installing the required packages
Run the following commands to install in order Percona Server 8, PHP 7.3 and related modules, Nginx and Redis. While installing Percona, select the legacy authentication mode and remember the admin password, since you will need it later.
wget https://repo.percona.com/apt/percona-release_latest.$(lsb_release -sc)_all.deb
dpkg -i percona-release_latest.$(lsb_release -sc)_all.deb
percona-release setup ps80
apt install percona-server-server
apt install software-properties-common
add-apt-repository ppa:ondrej/php
apt update
apt install php7.3
apt purge apache2
apt install nginx
apt install zip unzip
apt install php7.3-fpm php7.3-cli php7.3-curl php7.3-gd php7.3-intl php7.3-mysql php7.3-mbstring php7.3-zip php7.3-xml
apt install redis
Configure Redis
We will start by configuring Redis to only use RAM for caching and never write to the disk, since memory is much faster and provides a performance boost. Edit the /etc/redis/redis.conf file with your favorite text editor and start by commenting the lines that instruct Redis to save DB snapshots on disk:
save 900 1
save 300 10
save 60 10000
You will then have to add two lines at the end of the file, the first one configures the maximum memory (this depends on the RAM available on your server), while the second forces the deletion of old keys:
maxmemory 2G
maxmemory-policy allkeys-lru
Save your changes and restart the service:
systemctl restart redis-server
Configure Nginx
We will not detail all the configuration options of Nginx, but you will find many excellent config files tuned for Wordpress on the Internet. Modify these files by using your domain name and change the value of fastcgi_pass to the socket used by php 7.3. You will also have to create a folder structure for the fastcgi_cache used by Nginx, as well as setup the proper permissions:
mkdir /var/www/cache
mkdir /var/www/cache/wordpress
chown www-data:www-data /var/www/cache/ -R
Since you don’t have a SSL certificate yet, comment out the relevant lines in the second server block for now. Remove the default config file in /etc/nginx/sites-enabled/ and create a symlink from your file in /etc/nginx/sites-available/ to this folder in order to activate it. You can now restart the Nginx service:
systemctl restart nginx
Create a user and database for Wordpress
Wordpress needs a local database, so you’ll have to configure one before installing it.
Connect to Percona from the command line:
mysql -u root -p
Execute these commands in order, to setup the database, user and privileges:
CREATE DATABASE database_name;
CREATE USER 'user_name'@'localhost' IDENTIFIED WITH mysql_native_password BY 'strong_password';
GRANT ALL PRIVILEGES ON database_name.* TO'user_name'@'localhost';
FLUSH PRIVILEGES;
Exit
Install Wordpress
It is time to download and install the latest version of Wordpress, with the following commands:
wget https://wordpress.org/latest.zip
unzip latest.zip -d /var/www/
chown www-data:www-data /var/www/wordpress -R
rm latest.zip
You can now access the domain in a browser and complete the installation, enter the database credentials configured in the previous step. Go through all the steps and remember the admin user and password. Wordpress is now installed and working, but some further tweaks are needed.
Get a free SSL certificate
Generating and installing a SSL certificate for your site used to be a complex task but the certbot Nginx plugin makes it trivial. You only have to run three commands, the domain should be the one defined in Nginx’s server name directive, multiple subdomains can be added to the certificate:
add-apt-repository ppa:certbot/certbot
apt install python-certbot-nginx
certbot --nginx -d your_domain
You will be given the option to redirect all http traffic to https. Certbot will also setup a cronjob that automatically renews the certificate when it expires.
Install a plugin for Redis
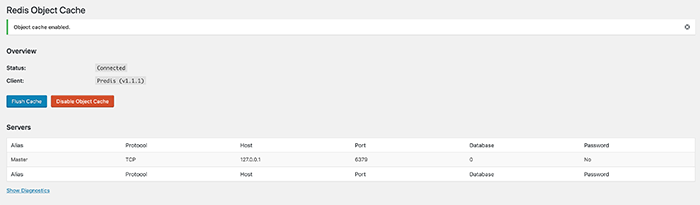
Redis is already configured to perform object caching in RAM, but Wordpress can’t use this feature without the correct plugin. The plugin named Redis Object Cache is a better choice than the official WP plugin, so install it from the Dashboard and activate it. You can now navigate to Settings -> Redis and click on Enable Object Cache, if the settings are correct the status should change to Connected.
Optimize PHP and Percona settings
The default PHP and database settings are not optimized for modern websites and have to be changed. Let’s start by editing the PHP configuration file /etc/php/7.3/fpm/php.ini. Look for the following lines and apply these values:
max_execution_time = 5000
memory_limit = 512M
upload_max_filesize = 128M
post_max_size = 128M
Save the file, then restart php-fpm:
systemctl restart php7.3-fpm
Finally, edit Percona’s configuration file vim /etc/mysql/mysql.conf.d/mysqld.cnf and add these lines under the [mysqld] block:
innodb_buffer_pool_size = 8G
innodb_log_file_size = 200M
innodb_buffer_pool_instances = 16
innodb_io_capacity = 5000
max_binlog_size = 200M
expire_logs_days = 3
After saving the changes, restart Percona:
systemctl restart mysql
That was it, you now have the fastest Wordpress stack possible with the packages currently available! We have tried to make this tutorial as simple to follow as possible, but please contact us by email if you have any questions or would like to suggest additional performance tweaks.
About the Author
Dragos Baldescu is a Level 2 Technical Support Engineer at Bigstep, passionate about Linux and testing out new technologies and solutions.
Comments
Readers also enjoyed:

Kubernetes Benchmark: Bigstep vs AWS [part 1]

Kubernetes Benchmark: Bigstep vs AWS [part 2]

Leave a Reply
Your email address will not be published.
25.05.2020 21:08
Why do you install php7.3, purge Apache to then install NGINX and php7.3-fpm?
12.06.2020 18:50
Will this WP environment also work on ubuntu 20.04 LTS or are additional modifications necessary?
06.04.2021 06:02
@Cristian I think it was a typo. Because he uses Nginx and fastcgi cache not Apache.
Anyway I agree for Redis but the truth is that you need to remove limits in Linux kernel if you really want a VPS to scale for high traffic, like this
https://github.com/littlebizzy/slickstack/blob/master/modules/ubuntu/sysctl.txt
I just found Bigstep right now so idk if they support it
08.04.2021 12:34
Apache needs to be purged because it’s installed by default along with php. However, Nginx is much faster, so Apache must be removed before installing it. Agreed about kernel limits, they can be tweaked on Bigstep servers. This stack is no longer the fastest and some tweaks are needed to make it work on Ubuntu 20 LTS. Subscribe to our blog and stay tuned, I will write an updated article soon.